
How to Clean Floor Tile and Grout
Keeping your home spotless and inviting begins with maintaining clean floor tile and grout. Over time, dirt, spills, and everyday foot traffic can take a toll, leaving your once-pristine surfaces looking lackluster. Do not be afraid! We’ll look at how to get a glossy floor that will make you want to live in your place in this article.
Gather Your Tools for floor tile and grout :
Acquire the necessary cleaning tools before beginning the cleaning process. This includes a bucket, a mop, a scrub brush, and a pH-neutral tile and grout cleaner. Additionally, consider having an old toothbrush and a microfiber cloth on hand for those hard-to-reach areas.
Sweep or Vacuum First:
Before applying any cleaning solution, start by removing loose dirt and debris from the floor. Sweeping or vacuuming will prevent these particles from scratching your tile during the cleaning process. Pay extra attention to corners and edges where grime tends to accumulate.
Choose the Right Cleaner:
Selecting the appropriate cleaner is crucial for effective tile and grout cleaning. Opt for a pH-neutral cleaner to avoid damaging the grout over time. Read the product label to ensure it is safe for your specific tile type.For the tile stain or grout cleaning best product is Ecolab brand Lemoneze chemical .Or you can make at home best homemade tile floor cleaner.
Homemade tile grout cleaner :
Homemade tile and grout cleaner DIY:Before delving into the process, gather your tools and materials. You’ll need baking soda, hydrogen peroxide, a small mixing bowl, an old toothbrush or grout brush, and a bit of patience. it will be best homemade floor tile cleaner also you can clean versa tile .
Create the Magical Paste:
Ingredients:
- 1/2 cup of baking soda
- 1/4 cup of hydrogen peroxide
Method: Combine the baking soda and hydrogen peroxide in the mixing bowl to form a thick, paste-like consistency. This dynamic duo works wonders to break down stains and brighten grout.
Apply with Care:
Dip your brush into the paste and generously apply it to the grout lines. The emotional touch here lies in the care you put into each stroke. Picture the grout absorbing the solution, rejuvenating with every application.
Let Love Sit:
Allow the paste to work its magic for at least 15-20 minutes. During this time, reflect on the transformation occurring beneath the surface. The bubbling reaction means that your grout is being revitalised by a harmonic combination of natural components.
Unleash the Brush of Affection:
With an old toothbrush or grout brush, gently scrub the grout lines. The emotional connection here is the tender yet firm strokes – a gesture of appreciation for the support your floor provides day in and day out.
Rinse Away Resentment:
Use water to rinse away the residue, unveiling a grout that not only looks rejuvenated but carries the essence of your effort and care. Picture the water washing away the remnants of wear, leaving a fresh canvas behind.
Bask in the Glow:
As the grout dries, bask in the glow of your revitalized floor. Imagine the grout thanking you for the attention, now ready to stand proudly alongside your tiles, a testament to the love and commitment you’ve poured into your home.
Pre-treat Stains:
For stubborn stains or discoloration, consider pre-treating the affected areas. Apply a small amount of the cleaner directly to the stain and let it sit for a few minutes. This will help break down the stain, making it easier to remove during the scrubbing phase.
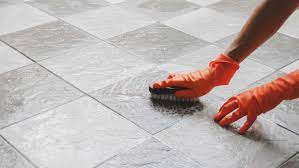
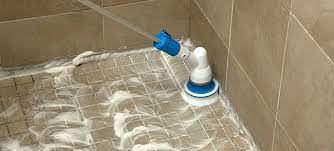
Scrub Gently but Thoroughly:
Armed with a scrub brush or an old toothbrush, start scrubbing the tile and grout. Work in small sections, applying moderate pressure to lift away dirt and stains. Be patient, and pay attention to grout lines, as they tend to trap dirt. For vertical surfaces like shower tiles, a handheld scrub brush is your best ally.
Mop Away the Grime:
Once you’ve scrubbed the entire floor, it’s time to mop away the loosened dirt and cleaning solution. Rinse your mop frequently to avoid spreading grime around. If your tiles have a textured surface, be sure to dry the floor thoroughly to prevent slips.
Dry and Admire:
After mopping, give your floor some time to air-dry or use a clean, dry microfiber cloth to speed up the process. Step back and admire your hard work – a sparkling clean floor that adds a touch of brilliance to your living space.
Cleaning floor tile and grout may seem like a daunting task, but armed with the right tools and techniques, it becomes a manageable and even satisfying chore. Regular maintenance is the key to preserving the beauty of your floors, ensuring they remain a testament to the warmth and cleanliness of your home. So, roll up your sleeves and let the transformative power of a clean floor unveil the true potential of your living space.